Got a pile of broken toys cluttering your home? If your toy box is bursting with forgotten figurines, single socks, and dolls missing limbs, you’re not alone. Tons of parents find themselves tiptoeing around plastic debris, unsure what to do next. But what if you could transform that mess into brand new playthings - without spending a dime?
Upcycling toys is the ultimate win-win: you clear your space, save money, and teach your kids the true meaning of creative recycling. And, let’s be honest, it’s pretty satisfying to watch a battered action figure morph into a superhero puppet or see bottle caps become a family-favorite game. This guide will show you exactly how - with easy DIY toy projects every family can tackle.
Ready to see what’s possible? Let’s dive in.
Why Upcycle Toys? Embracing 2026's Top Trends
Imagine this: Your child’s old, neglected toys - those beloved but battered remnants - get a second chance to shine. Instead of ending up in a landfill or gathering dust, they become the spark for laughter and learning all over again. That’s the power of upcycling toys. It’s not just about saving money (though, honestly, who doesn’t love that?). It’s about cultivating creativity, making memories, and showing kids how fun sustainability can be.
Here’s a wild stat: Searches for “upcycled baby clothes” and “1970s childhood toys” skyrocketed between September 2024 and August 2025, according to Pinterest Predicts. Clearly, families are craving nostalgia and eco-friendly fun. The throwback trend is real - kids want a taste of retro play while parents seek ways to avoid waste. By blending vintage vibes with modern crafting, you can create toys that are both trendy and timeless.
Plus, upcycling toys is basically a masterclass in creative recycling for kids. They see firsthand how imagination and resourcefulness can turn “trash” into treasure. You get to say, “We made this together!” and mean it. And you’re helping the planet, one quirky, one-of-a-kind project at a time.
If you’re new to DIY, don’t sweat it - these toy recycling ideas are super accessible. Want to build your crafting confidence first?
Top 10 DIY Toy Projects for Kids
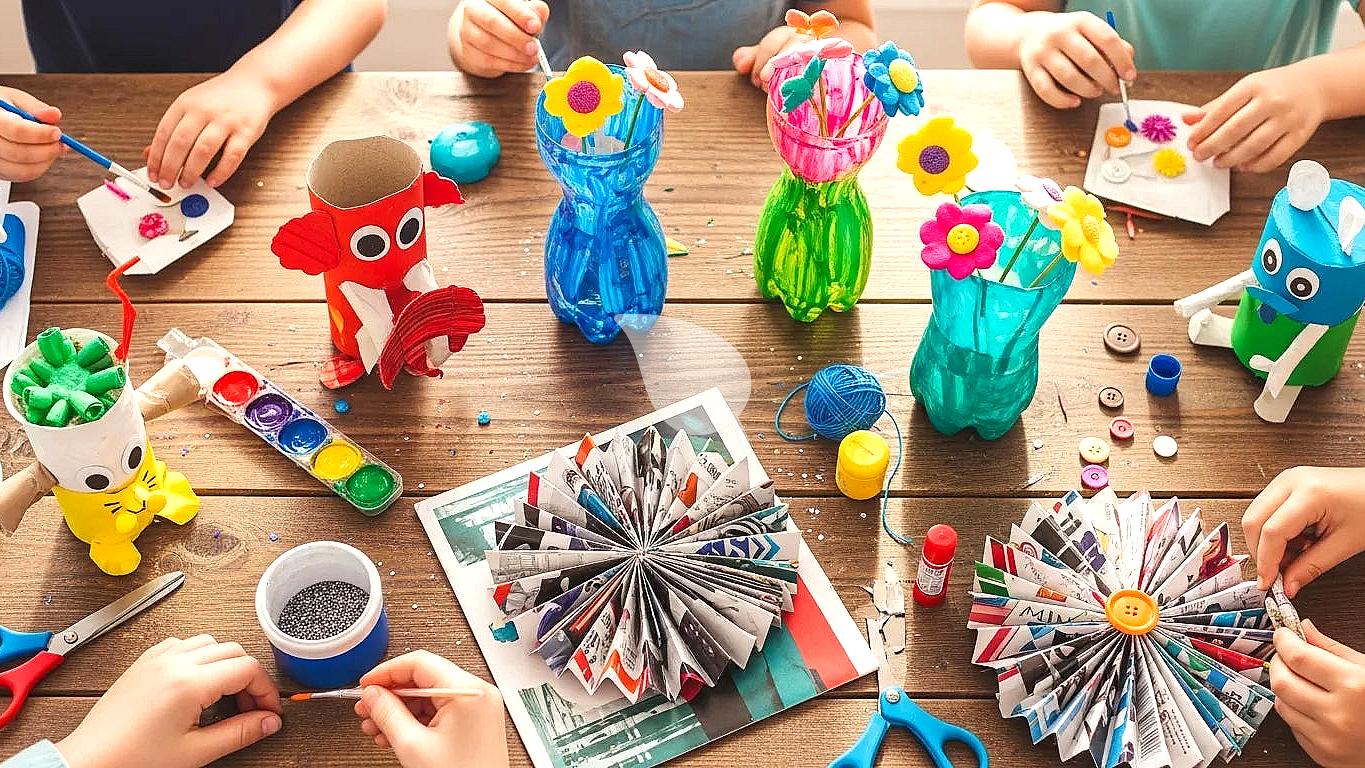
Dive into these kid-friendly, practical projects that turn scraps and broken toys into new, exciting creations. Each project is designed to spark imagination, keep budgets in check, and - most importantly - ensure everyone’s safe and smiling.
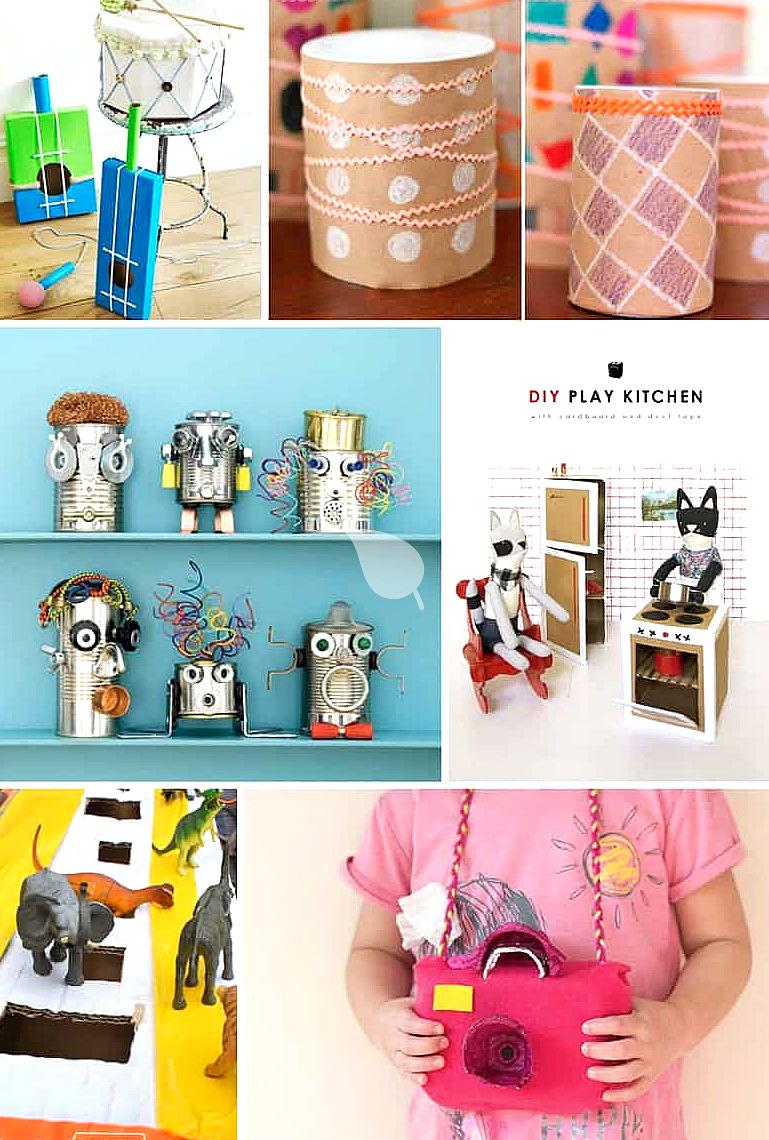
Transform Broken Dolls into Superhero Puppets
- Select old dolls with removable parts. Dig up those dolls missing a shoe or an arm - nobody cares! In fact, the more “well-loved,” the better. Look for dolls with movable limbs for easier puppet action.
- Add simple fabric accessories for instant transformation. Cut up old T-shirts or felt scraps to make superhero capes, masks, and belts. Use fabric glue or safety pins to secure. Suddenly, that forlorn doll is a caped crusader, ready to save the day!
- Use printable templates for costume shapes. Download free templates for capes and masks from online craft sites. Trace and cut, then let your child decorate with markers, glitter, or leftover ribbon. Encourage them to invent superhero names and stories for their new puppet squad.
Expert Insight: “Upcycling, remaking, repairing, reusing... makers are turning to what we already have. Crafting becomes smarter, more intentional.”
- Jennifer Maker, 7 Craft Trends That Will Be HUGE in 2026
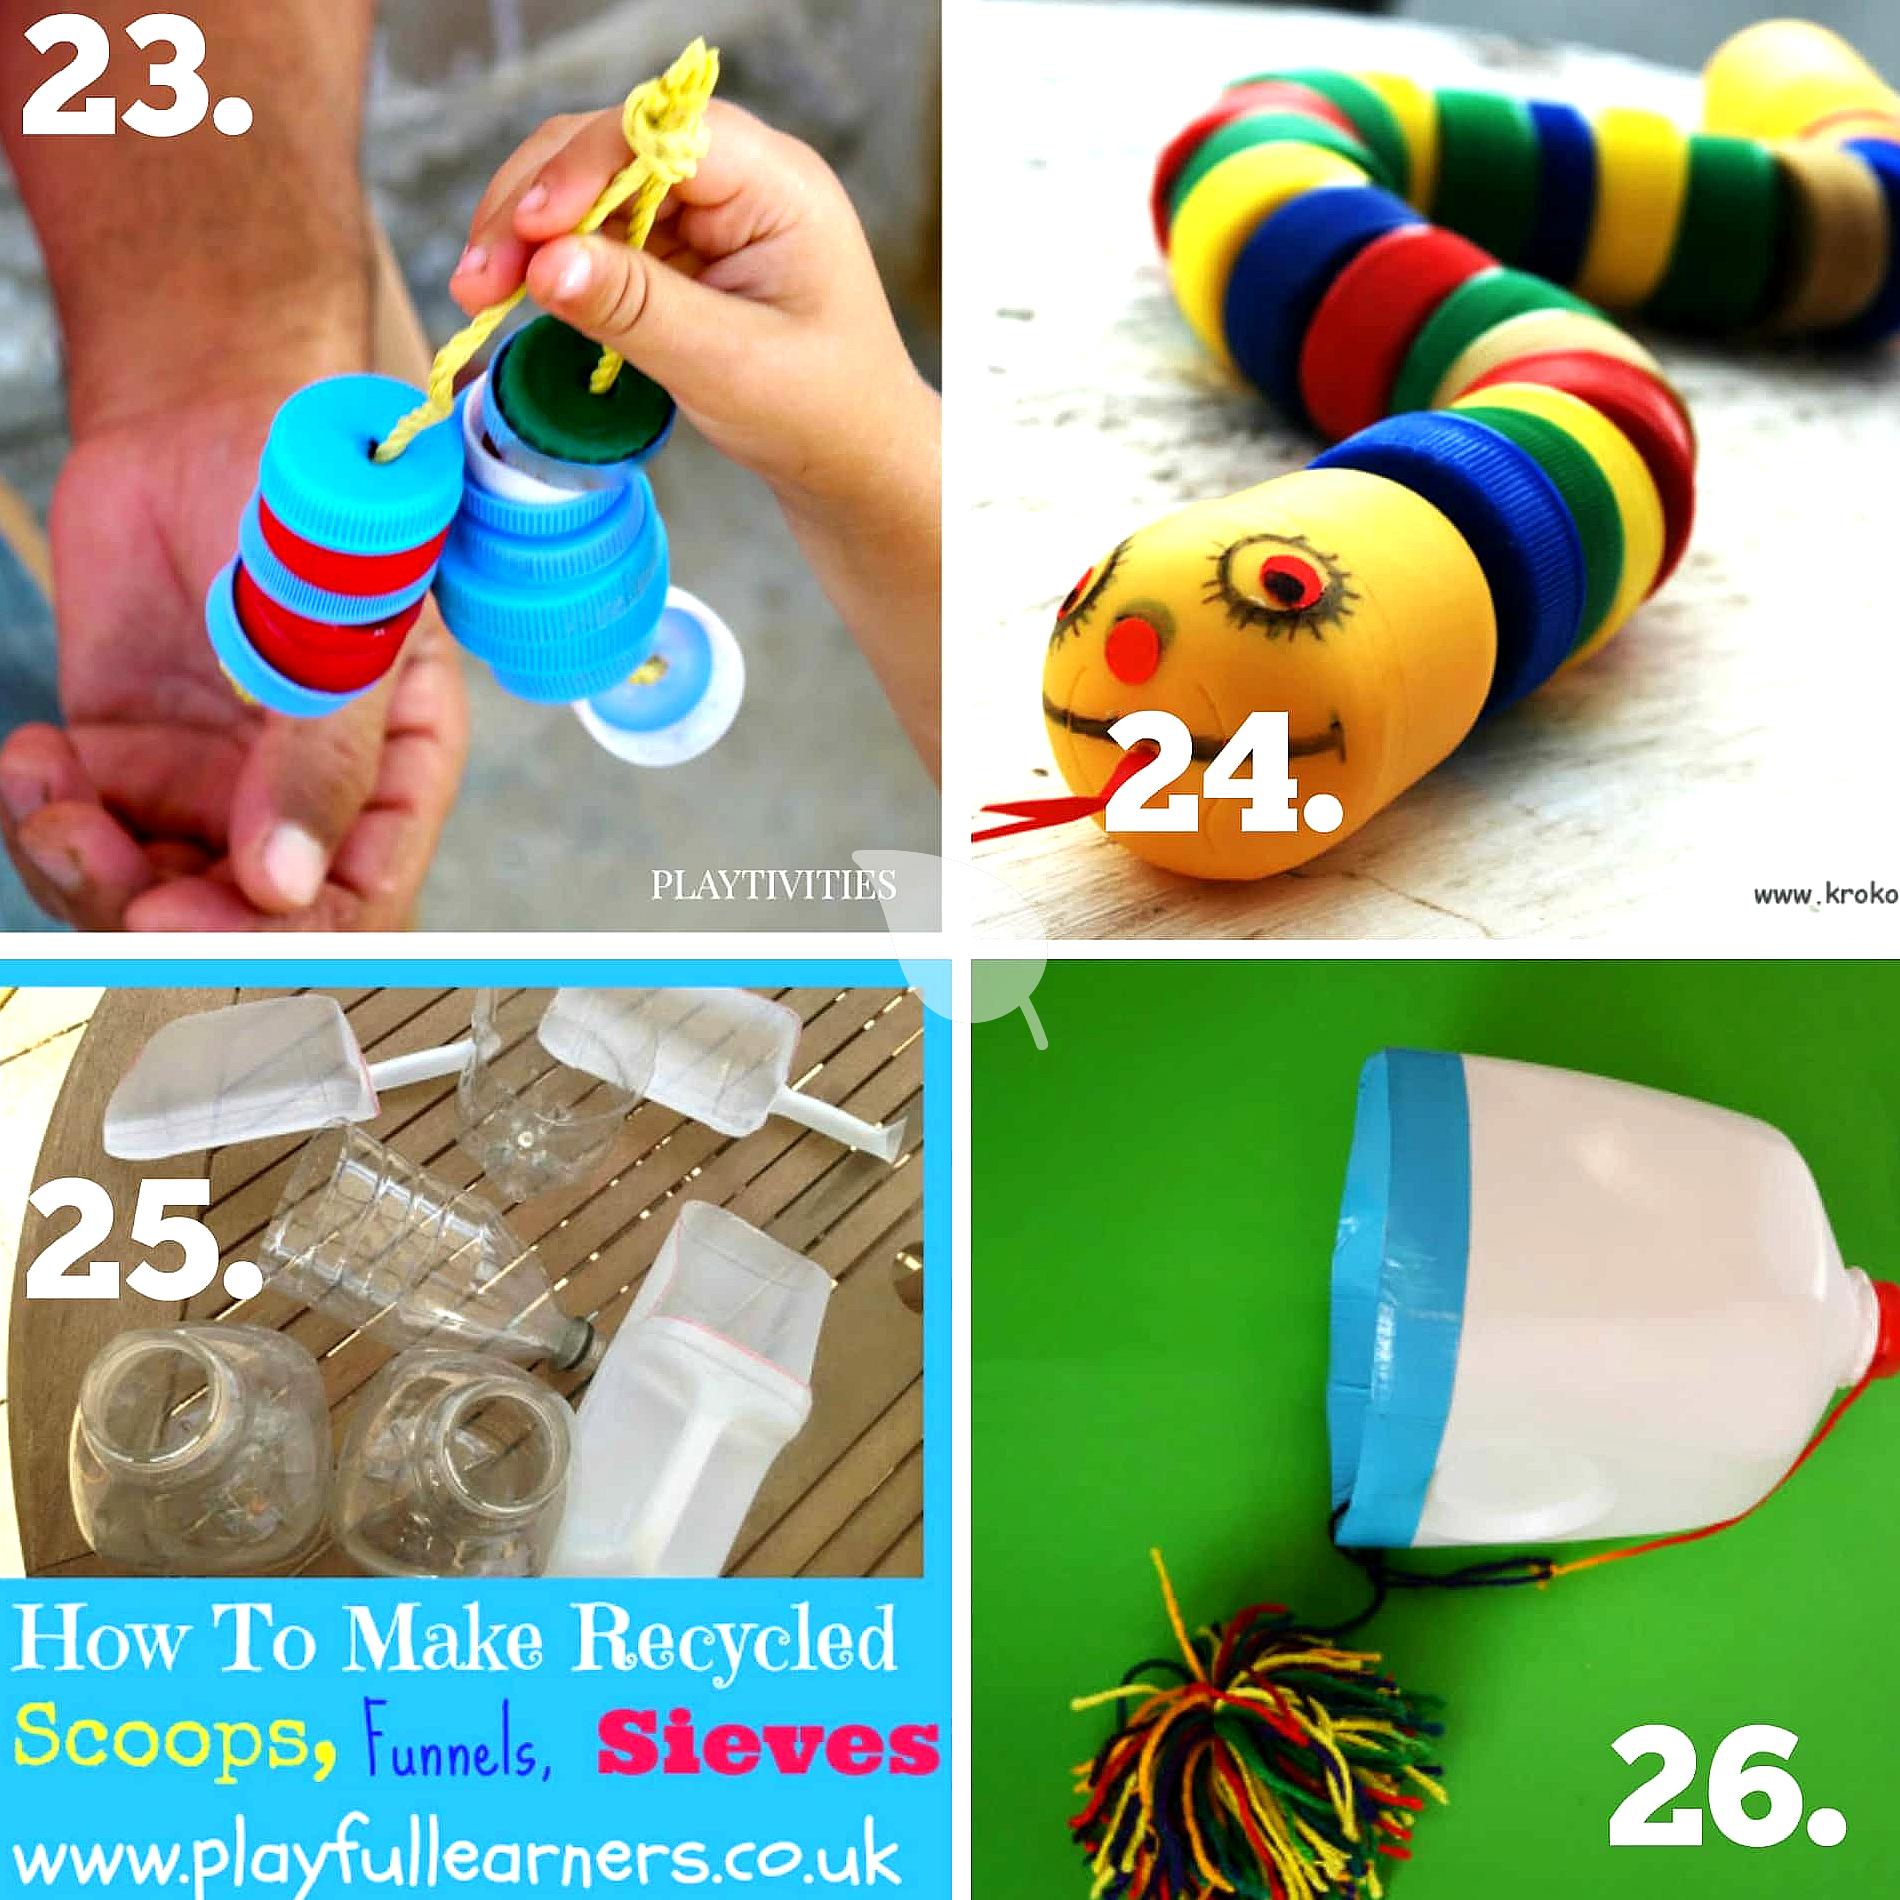
Turn Bottle Caps into Colorful Checkers Pieces
- Gather bottle caps and a wooden board. Start saving plastic or metal bottle caps of similar size. A scrap of plywood or a thick cardboard square makes a great game board.
- Use painting and sealing techniques for durability. Paint the bottle caps in two bold colors using non-toxic acrylics. Once dry, brush on a clear sealant to prevent chipping. For the board, draw a checkered pattern with a ruler and permanent marker, then paint squares to match.
- Learn about bottle cap recycling facts for context. Each checker set keeps dozens of caps out of landfills. For more surprising stats, check out bottle cap recycling facts.
Case Study: The "Bottle Cap Checkers Board" project took only an afternoon and became a cherished family game. In one family, the finished board was even sold as a unique handmade gift - proving upcycled toys can be fun and valuable!
Create Scrapboard Games Using Household Items
- Use cardboard, buttons, and scraps to build board games. Flatten out a cereal box or shipping box to make your game board base. Buttons, beads, or mismatched game pieces can serve as player tokens. Let your child design the board layout with paint, markers, or collage art.
- Game design basics for kids. Encourage your child to invent simple game rules: roll a die to move, pick a card to advance, or answer a trivia question. The creative process is as educational as it is entertaining!
- Add variations for different age groups. For younger kids, make a color-matching path game. For older children, try a trivia challenge or strategy game - add more detailed rules, or build obstacles with popsicle sticks and rubber bands.
Callout: Always check materials for sharp edges before crafting. Even the coolest project isn’t worth a trip to the ER!
The Upcycle Advantage: Why These Projects Work
- Using old toys sparks creativity and declutters homes. Upcycling toys extends their life, clears out clutter, and lets kids take ownership of their creations. Remember that torn doll? Now she’s a superhero puppet, loved more than ever.
- Projects require common supplies and are budget-friendly. Most of what you need comes from your recycling bin or junk drawer. As Dollar Tree upcycle transformations have proven, even charger plates and jars can become festive decor or playful crafts for less than a dollar apiece.
- Safety is key with kid crafts. Always supervise tool use and choose age-appropriate projects. Refer to our safety checklist in the next section.
Pro Tip: When in doubt, swap in fabric glue or rounded scissors for little hands. It’s not just safer - it actually boosts kids’ confidence as crafters!
Curious about larger toy trends for 2026 and what kids are craving next? Read more at Top Toy Trends for the UK in 2026.
Next, let’s make sure those clever creations are as safe as they are fun.
Action Steps to Start Upcycling Toys Today
Here’s your no-fuss, 3-step system for beginning your upcycle toys journey. No special skills, fancy tools, or Pinterest perfection required. Just real-world tips for real families.
-
Gather Old Toys and Scrap Materials
- Collect every broken, outgrown, or unloved toy from your home. Think action figures, puzzle pieces, dolls, and even random buttons or beads. Put them all in a dedicated box you can raid for each project.
- This instantly declutters your space and ensures you have plenty of supplies ready for crafting. Avoid using sharp, brittle, or very tiny pieces that could be choking hazards - safety comes first.
- Example: One family set up a "Toy Scrap Bin" in the mudroom, making it easy for kids to add bits and bobs they find.
-
Choose a Project Suitable for Your Child's Age
- Match the project to your child’s skill level. For younger kids, stick to decorating projects (think: painting bottle caps or gluing costumes). For older children, try building or assembly-based crafts that involve more steps or tools.
- Supervision is always key - especially when scissors, glue guns, or paints are involved. Save complex projects for when you can be hands-on, side by side.
- Example: A 6-year-old can help paint checker pieces, while a 10-year-old might assemble the board itself.
-
Follow Step-by-Step Instructions with Safety in Mind
- Use printable templates or video demos when available. Lay out each step before beginning, and don’t rush. Keep a safety checklist handy - this is your go-to for checking materials, tool use, and safe cleanup.
- Teach your kids to respect the tools and always clean up together. Responsible crafting habits are as important as any finished project!
- Example: Only allow younger children to use blunt-tip scissors and water-based, non-toxic paints.
Mistakes to Avoid When Upcycling Toys
Even the most enthusiastic upcyclers can run into trouble. Here are three common mistakes - and proven fixes - that will keep your toy upcycle journey safe and joyful.
-
Using unsafe materials like sharp broken parts. It’s tempting to toss everything in, but anything with jagged edges, rust, or brittle plastic needs prepping first. These hazards can cause cuts or worse.
- Fix: Sand sharp edges smooth, toss out anything that can’t be cleaned or blunted, and double-check all materials before starting.
-
Skipping age-appropriate project selection. Not every project fits every child's age or ability. If a craft is too hard or risky, kids get frustrated - and could get hurt.
- Fix: Choose crafts that match your child's age and attention span. Save glue guns and intricate steps for teens or supervised sessions.
-
Not supervising tool use during crafting. Accidents happen fast. Unsupervised gluing, cutting, or drilling can lead to injuries.
- Fix: Stay nearby during all crafting sessions and model safe tool habits. Set clear rules: "Ask before you cut," or "We use glue together."
Pro Tip: If you have a mixed-age group, prep individual activity stations so everyone works on something safe and engaging.
Helpful Tools and Resources for Toy Upcycling
A few handy resources make upcycling toys easier (and more fun!):
- Printable Template Kits: Pre-made patterns for superhero capes, animal ears, and more. These save time and boost creativity - just print, trace, and cut!
- Video Tutorials: Step-by-step guides are a lifesaver, especially for visual learners. Quick YouTube searches for “DIY upcycled toy crafts” yield dozens of inspiring, kid-tested demos.
- Safety Checklist: A clear, printable list of dos and don’ts. Tape it up in your crafting area so everyone remembers to check supplies and tools before getting started.
Expert Tip: Laminate your favorite templates and checklists. It’s a small touch, but it means you’re always ready for last-minute crafting urges, spill-proof and stress-free.
Real-World Examples of Toy Upcycling Success
Need proof that upcycling toys actually works? Check out these two real-life upcycle victories:
-
Dollar Tree Upcycle Transformations: Families took simple materials - charger plates, empty jars, even faux snow - and turned them into festive holiday decor and snow globe toys. With less than $5, one parent created a whole winter wonderland centerpiece, proving that creativity trumps cost every time.
-
Bottle Cap Checkers Board: After collecting bottle caps and scrap wood from the garage, a family built a checkers set that quickly became their favorite rainy day game. The project was so successful, they made dozens more as gifts. In a surprising twist, some even sold their upcycled checkers boards online as unique, eco-friendly gifts - showing that recycling toys can spark entrepreneurial spirit, too!
FAQ About Upcycling Toys
What toys can I upcycle with kids?
Many old or broken toys like dolls, plastic action figures, wooden blocks, and board game pieces are perfect for upcycling. The key is to pick toys that can be safely disassembled or decorated. Combine them with household items like buttons, bottle caps, or fabric scraps to unlock endless possibilities.
How to make DIY toy projects from old toys?
Start by gathering suitable toys and leftover materials. Choose projects that fit your child’s age - simpler crafts for little ones, more complex builds for older kids. Always follow step-by-step guides and use safe, child-friendly tools. Supervise your kids throughout, and encourage them to get creative with paints, fabric, and fun accessories.
Are upcycled crafts safe for children?
Absolutely! When you inspect materials for sharp edges, choose age-appropriate projects, and use non-toxic supplies, upcycled crafts are safe and rewarding. Always supervise tool use and follow a safety checklist to keep everyone happy and healthy.
Conclusion: Make Upcycling Toys a Fun Family Tradition
Upcycling toys isn’t just about decluttering your closet or saving a few bucks. It’s a hands-on way to teach kids about sustainability, resourcefulness, and the magic of creativity. These DIY toy projects transform old clutter into new playtime treasures, all while sparking joy for your family and a little less waste for the world.
Blending vintage nostalgia with eco-friendly habits is more than just a trend - it’s a lifestyle. Whether you’re turning broken dolls into superheroes or building a checkerboard out of bottle caps, you’re showing your kids how to see possibility where others see junk.
Remember, the secret to fun and safe upcycling lies in picking the right projects, keeping an eye on safety, and celebrating every quirky creation. Download our free Upcycle Checklist below to kickstart your first adventure. Who knows - maybe your family’s next masterpiece will inspire friends, neighbors, or even the world.
So, what are you waiting for? Join the growing movement to upcycle toys and ignite young imaginations, one playful project at a time.
Tags
Join Our Mission
Support our conservation efforts and make a difference today.